Wednesday, August 22, 2012

Wedding Trousseau Checklist


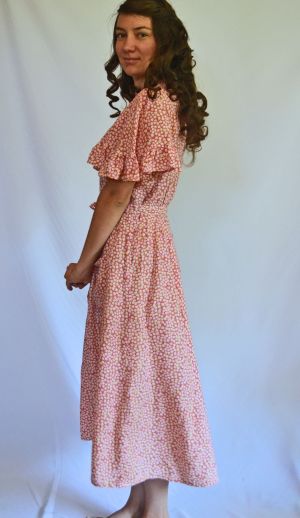
As I have been able to make time in the past month, I've been excitedly working on my 1860s wedding 'trousseau'. Not only am I planning the dress, but a whole new set of dainty underpinnings as well. (One can't get married in old mud-stained petticoats, can one? lol)

From an 1860 edition of 'The Ladies' Book of Etiquette, Fashion and Manual of Politeness', the author recommends: "In Preparing a bridal outfit, it is best to furnish the wardrobe for at least two years, in under-clothes, and one year in dresses...If you are going to travel, have a neat dress and cloak of some plain color, and a close bonnet and veil."
( I wonder how many dresses this would constitute? Perhaps it would just depend on the financial cirumcstances of the bride's family....)

The author also makes notes about the wedding and bridesmaids dresses:
"The bride's dress must be of white entirely. If she is married in the morning, a plain white silk, white mantle, and white bonnet, full trimmed with orange flowers, with a plain veil, is the most suitable dress, and she may wear a richer one at her recpetion, when she returns from her bridal tour"

"The bridesmaids may wear white, or some thin, light colored material over white, a head-dress of flowers, and  carry boquets of mixed flowers".

This very helpful and interesting 1860s etiquette book was purchased from Amazon Drygoods.

French fashion doll's trousseau and its trunk, 1865

My trousseau will only include what I will be wearing at the wedding ceremony. It would be such fun to make an extensive 1860s wardrobe as a 'trousseau', but not very practical! :)

On my list:
Chemise, drawers, and two petticoats of fine cotton batiste,
    all fancy trimmed in lace and/or tucks.
White (silk?) stockings
Corset of sateen and coutil
Cage crinoline
Headdress
 Dress - silk and cotton

Of the nine items, I have three completed so far - the chemise and petticoats.
 It's been such fun working on them! Here are a few in progress pictures:


China buttons and lace on the chemise.
The fabric I am using is a beautifully soft and lightweight white cotton batiste from Wholesale Fabrics.

Gauging on the over petticoat

Sewing in 1/4" tucks


I'm including several types of white heirloom laces given to me by friends - so special! :)

Lots and lots of tucks....

So, now you know I am making progress, however slowly! :)

Friday, August 17, 2012

1940s Pink Polka-Dot Dress

Just last week finished a 40's dress project that has been in the back of my mind since last fall. When Mom and I were in Hancocks fabric store, I saw this lovely mauve pink and brown polka-dotted rayon fabric, deliciously sheer and floaty in the clearance fabric. I immediately envisioned it as a swingy, feminine 1940s dress. But - what to use as lining? Well, we happened upon a remnant of very lightweight silk satin - there was *just* enough fabric to use for dress lining. Not a scrap more, but it was the perfect color to match the rayon and provide the right color of lining.

I got....a little busy and distracted last winter (Jordan...:) and somewhat forgot about the project. And it wasn't until a couple of weeks ago that I had a definite idea of how I wanted the dress to look:

My inspiration picture (found on Pinterest, where else?):

So, to copy the dress seen at left, I pulled out my stash of vintage patterns and began piecing together the different elements, ended up having to use 4 different 1940s patterns!
Here are the main ones:

Dress bodice was cut from this 1941 McCall's Pattern

 
Dress skirt was cut from this 1942 pattern, over skirt had added width for gathers.

Sleeves were cut from this 1942 mail-order pattern from
 'Fort Worth Morning Star-Telegram, Pattern Dept., Marian Martin Patterns'
They all went together quite well!

Thankfully all the patterns were the same size, so it was easy to mix-and-match.

I altered the bodice pattern to have a V-neck, and added a collar. The collar would *not* stay ironed correctly when I first made it (squirmy rayon and silk just don't always obey....) So I "fixed" it by adding dark brown cotton homemade bias tape all around. Stay! lol. Then after doing that, I had to add a matching dark brown cotton voile tie belt. Hey! all this was meant to happen. The brown plastic buttons are the only ones I could find that matched from my random tin of button chaos.
Unlined sleeves are hemmed and then gathered in with elastic for a little 'ruffle' effect.

Newly-aquired vintage 40s scalloped brown straw hat makes a nice addition.


Really adore the swingy-ness of the skirt - the sheer rayon fabric floats on air.
Can't wait to wear it to our next swing dance!


I do have a couple of faults to confess with this dress - the buttons are slightly off center. Don't really know how this happened - but it's not major enough that I'm going to worry about it. :)

Also, the skirt ended up just a tiny tad longer in front than in back. Grr. That is fixable, but I am *not* going to take the hem out - I would be afraid of disaster striking. I love the feel and flow of both the silk satin and the rayon sheer, but they were SO hard to work with. They both squiggled and squirmed around so much while i was sewing and didn"t hold an ironed crease it"s a wonder any of the pattern pieces turned out the right shape!


I hemmed the silk underskirt a few inches shorter than the sheer overlayer to get a more ethereal effect.
Shoes are from 40's style swing dance shoes from Aris Allen , in brown suede and white mesh.
 I really like the medium-height of the heel.

So, there you have it! My latest 40's project.

Do you have any retro projects going on right now? I'd love to see them!


Thursday, August 16, 2012

1940s Housecoat


Every since I have been collecting and using vintage patterns (about 2 years), this has been one of my very favorites, and one that has been high on my much neglected personal sewing to-do list;
"1949 McCall's 7635 Ladies and Misses Negligee"

This spring I finally got around to making it, and it went to gether quite simply and easily - wished I'd done it before!
I don't really know whether to call it a houscoat, robe, or wrapper.....


Mine didn't turn out nearly as glamorous as the pattern picture, but then I didn't expect it to! :) And I don't wear high heels around the house either. lol.
However - my '40s wrapper' is the most comfortable and handy thing ever! I love it. The fabric is a lightweight and cool rayon challis in candy pink print. I did make a few changes to the pattern - hemmed it shorter, added a pocket, and instead of having the tie belt as a separate piece, I stitched it to the back (knew I would end up losing it otherwise!) The bodice is fitted with tucks, and the ruffled 'cape' piece also forms the loose sleeves.


It's so handy to have something easy and comfortable to wear over pj's, or when getting ready for a party or dance (on those rare occasions! :). I love my 1860s wrapper at reenactments, I don't know why it took so long for me to realize that I needed one for everyday!

As you notice, my hair is newly pin-curled in these pictures. I was getting ready for a 40's photoshoot with my newest dress, which you will be seeing soon...


Friday, August 10, 2012

Very Final Museum Dress Update

Remember the dress I made last winter for the Museum of the Confederacy?


Well, there has been a slight change discovered. This dress is not displayed at the museum in Richmond, VA as I had thought.


When my friend Rebecca and her family were traveling through Virginia on vacation in June, they did some searching and found the dress and its display at the Museum of the Confederacy at Appamatox!

You can see more pictures on the Museum's website here, and be sure to watch the informational video linked on the front page - the dress is featured twice!


Wednesday, August 1, 2012

Homemade Gift-Cards

Home-made gift-cards!
{Inspired by vintage postcards}

Recently we had several brides and graduates of our aquaintance that we wanted to gift. Mom and I wanted the gift to come from among the lovely items at Creative Memories, for which she has recently become a consultant, and we just adore using their lovely items to display our photos in albums, etc. However, we didn't know if our intended recipients would prefer traditional scrap-booking, digital, or something completely different, such as a magnetic photo display. So - we tossed around the idea of a gift-card...but it seemed so booor-ing to simply print off an internet gift card. So, we came up with the idea to use vintage post-cards as an inspiration, and just make our own!

Using some little textured watercolor cards I had on hand, using stamps, colored pencils, and pens, I made a unique card for each.


The 'post cards' were held in place by making little round cuts in the larger info sheet.
This sheet (included with an enclosed catalog) explained how to redeem the gift card, and the contact info necessary.

Birds, butterflies, and hand-drawn 'stamps'...
The backside of the cards had the amount of the gift, and the name of the shop.
(Creative Memories, in this case)

Much more interesting than the usual giftcards, no?
I think this would be a great idea for gifting a friend from an Etsy shop, if you were the owner, or if you knew the owner who would work with you...
The same idea would also be fun for a invitations, or valentines, or gifting a surprise girls-day-out.  

I used:
- Rubber stamps from Cavallini & Co.
- Paper from Creative Memories
- Textured Artist Trading Cards - like these.
-Felt-tipped pens, colored pencils

LinkWithin

Related Posts with Thumbnails